Facial Recognition
Facial recognition is used in video surveillance such as on doorbell cameras, to tag subjects in social media posts, to unlock cell phones and computers, and in many other biometric applications. Marketers can use face detection with a webcam to predict the gender and age of the person to deliver targeted content. Cell phone camera apps include the feature to autofocus on a face or take the photo when a smile is detected. Keyless entry systems on an automobile may use facial recognition to unlock and enable the vehicle as well as adjust the seat position for the driver.
Students learn more if they have a personalized learning experience with their peers and the instructor. Instructors personalize the experience by learning things about each student including their name. Instructors also recognize when a student is absent or needs additional help. When a student is absent, an instructor often sends a message to check in and to give instructions for the missed content. Taking attendance each day and remembering to follow-up with an email can be a challenging task for teachers with a large class.
Objective: Develop a facial recognition system for participants in a class. Set up a camera to detect when an individual enters the classroom. Welcome them to the class with an audio message that uses their name. Record attendance with the name of the student and time that the student entered. If the student did not attend, send a text message or email with instructions for accessing the content for that day.
This is a challenging class project that requires the participation of all through collaborative programming and team work. Suggested roles are:
- Agile Development Leader
- Data Engineering
- Face Detection
- Classification
- Communication
There are many resources and tutorials online for the individual parts of the project. The challenge is to tie all of the pieces together and to tune the application for speed and accuracy. Below are some suggestions and references.
Agile Development
Agile software development is a software building process typically with small groups of 10 or less. The group plans for a sprint and holds daily meetings to discuss progress and obstacles. Burndown charts, task boards, and sprint plans are used to track progress instead of a Gantt chart. These metrics communicate progress and critical development items. With new software products, the focus is hyper-focused on a Minimum Viable Product (MVP). Any extra features are saved for a future release.
The agile group leader enables collaboration through daily meetings and file sharing such as Box, Dropbox, or Google Drive. Code is best shared with simultaneous editing on Google Colab or through a repository hosted on GitHub or GitLab. The leader pulls together all contributions and tracks team effectiveness.
Data Engineering
Data engineering is retrieval, storage, and optimizing the flow of data. The responsibility of the data engineering team is to collect data from the camera, store multimedia content, split into train, validation, and test data, and build the data pipeline for the automated attendance system.
Face Detection
The face detection team explores methods to detect faces in a still frame or sequences of frames in a video stream. The face image is converted to a standard form for training and prediction. Each algorithm should be evaluated for real-time performance on the target hardware (Raspberry Pi, cloud computing, or laptop computer with GPU). Sample code is provided for MediaPipe Neural Networks, Multi-task Cascaded Convolutional Neural Networks (MTCNN), and a Cascade Classifier. Other potential face detection algorithms are YOLO (You Only Look Once) or YOLOR (You Only Learn Once Representation).
MediaPipe is a cross-platform package (Python included) for detection of objects, including faces. It is based on TensorFlow with pre-trained weights and is an open-source project released by Google. Also see the exercises on hand tracking.
import mediapipe as mp
mp_face_detection = mp.solutions.face_detection
mp_drawing = mp.solutions.drawing_utils
import urllib.request
# download image as class.jpg
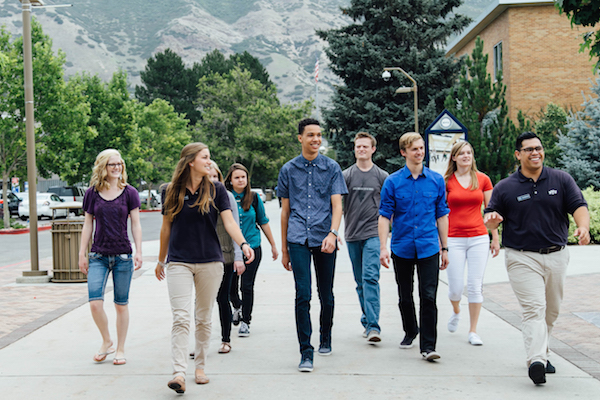
url = 'http://apmonitor.com/pds/uploads/Main/students_walking.jpg'
urllib.request.urlretrieve(url, 'class.jpg')
IMAGE_FILES = ['class.jpg']
with mp_face_detection.FaceDetection(
model_selection=1, min_detection_confidence=0.5) as face_detection:
for idx, file in enumerate(IMAGE_FILES):
image = cv2.imread(file)
# Convert the BGR image to RGB and process it with MediaPipe Face Detection.
results = face_detection.process(cv2.cvtColor(image, cv2.COLOR_BGR2RGB))
# Draw face detections of each face.
if not results.detections:
continue
annotated_image = image.copy()
for detection in results.detections:
print('Nose tip:')
print(mp_face_detection.get_key_point(
detection, mp_face_detection.FaceKeyPoint.NOSE_TIP))
mp_drawing.draw_detection(annotated_image, detection)
cv2.imwrite('annotated_image' + str(idx) + '.png', annotated_image)
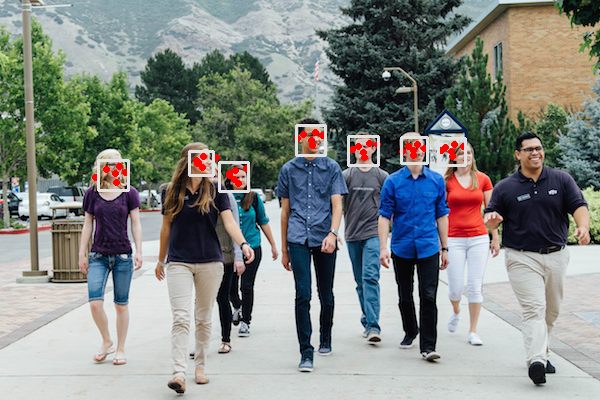
MediaPipe detects 7 of the 9 faces of the students walking.
MediaPipe is also able to detect faces in real-time video streams, such as from a video or web camera.
import mediapipe as mp
mp_face_detection = mp.solutions.face_detection
mp_drawing = mp.solutions.drawing_utils
# webcam input
cap = cv2.VideoCapture(0)
with mp_face_detection.FaceDetection(
model_selection=0, min_detection_confidence=0.5) as face_detection:
while cap.isOpened():
success, image = cap.read()
if not success:
print("Ignoring empty camera frame.")
# If loading a video, use 'break' instead of 'continue'.
continue
# To improve performance, optionally mark the image as not writeable to
# pass by reference.
image.flags.writeable = False
image = cv2.cvtColor(image, cv2.COLOR_BGR2RGB)
results = face_detection.process(image)
# Draw the face detection annotations on the image.
image.flags.writeable = True
image = cv2.cvtColor(image, cv2.COLOR_RGB2BGR)
if results.detections:
for detection in results.detections:
mp_drawing.draw_detection(image, detection)
# Flip the image horizontally for a selfie-view display.
cv2.imshow('MediaPipe Face Detection', cv2.flip(image, 1))
if cv2.waitKey(5) & 0xFF == 27:
break
cap.release()
The Python package MTCNN is Multi-task Cascaded Convolutional Neural Networks for Face Detection. It is based on TensorFlow with pre-trained weights. The detect_faces function identifies the bounding box for the face and the position of each nose, right eye, left eye, left mouth, and right mouth.
from mtcnn.mtcnn import MTCNN
import urllib.request
# download image as class.jpg
url = 'http://apmonitor.com/pds/uploads/Main/students_walking.jpg'
urllib.request.urlretrieve(url, 'class.jpg')
def draw_faces(data, result_list):
for i in range(len(result_list)):
x1, y1, width, height = result_list[i]['box']
x2, y2 = x1 + width, y1 + height
plt.subplot(1, len(result_list), i+1)
plt.axis('off')
plt.imshow(data[y1:y2, x1:x2])
plt.show()
pixels = plt.imread('class.jpg') # read image
detector = MTCNN() # create detector
faces = detector.detect_faces(pixels) # detect faces
draw_faces(pixels, faces) # display faces
The all but one of the student faces are recognized and the bounding boxes are displayed.
The confidence for each of the detected faces is also available.
print(x['confidence'])
Each of them have a confidence over 0.999. The confidence is important to adjust the rate of false positives (Type-I errors) for face detection.

The OpenCV Python package has a pre-built cascade classifier for Face Detection that is stored as an xml file. The decision on face or no face is evaluated in stages that analyze each block of the image. If the stages check fails, then the cascade stops and a face is not detected. However, if it continues and passes all of the stages then a face is detected and the bounding box is returned.
import matplotlib.patches as patches
import cv2
import urllib.request
# download image as class.jpg
url = 'http://apmonitor.com/pds/uploads/Main/students_walking.jpg'
urllib.request.urlretrieve(url, 'class.jpg')
# download cascade classifier configuration
url = 'http://apmonitor.com/pds/uploads/Main/cascade.xml'
urllib.request.urlretrieve(url, 'cascade.xml')
def draw_faces(data, result_list):
for i in range(len(result_list)):
x1, y1, width, height = result_list[i]
x2, y2 = x1 + width, y1 + height
plt.subplot(1, len(result_list), i+1)
plt.axis('off')
plt.imshow(data[y1:y2, x1:x2])
pixels = plt.imread('class.jpg')
faceCascade = cv2.CascadeClassifier('cascade.xml')
gray = cv2.cvtColor(pixels, cv2.COLOR_BGR2GRAY)
faces = faceCascade.detectMultiScale(gray,scaleFactor=1.1,
minNeighbors=2,\
minSize=(10, 10))
# display only the faces
draw_faces(pixels, faces)
# display identified faces on original image
fig, ax = plt.subplots(); ax.imshow(pixels)
for (x, y, w, h) in faces:
rect = patches.Rectangle((x, y), w, h, lw=2, \
alpha=0.5, edgecolor='r', \
facecolor='none')
ax.add_patch(rect)
plt.show()

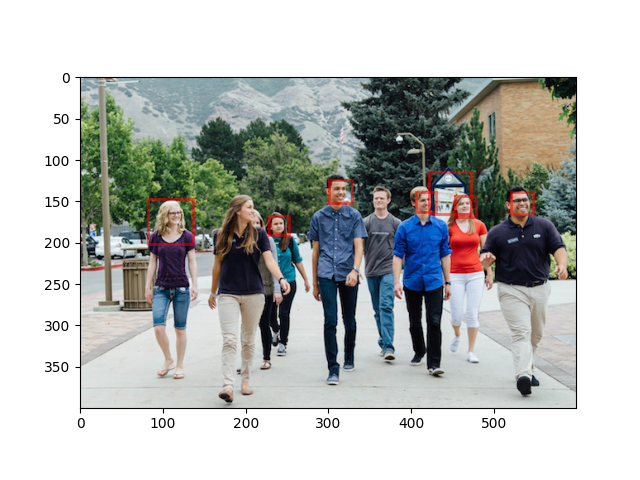
The cascade classifier approach is not as accurate as the Multi-task Cascaded Convolutional Neural Network but it is sufficiently fast for face detection in a video stream.
import time
import urllib.request
# download cascade classifier configuration
url = 'http://apmonitor.com/pds/uploads/Main/cascade.xml'
urllib.request.urlretrieve(url, 'cascade.xml')
faceCascade = cv2.CascadeClassifier('cascade.xml')
video_capture = cv2.VideoCapture(0)
t = time.time()
while time.time()-t <=20: # run for max 20 sec
ret, frame = video_capture.read()
gray = cv2.cvtColor(frame, cv2.COLOR_BGR2GRAY)
faces = faceCascade.detectMultiScale(gray,scaleFactor=1.1,
minNeighbors=5,minSize=(30, 30))
for (x, y, w, h) in faces:
cv2.rectangle(frame, (x, y), (x+w, y+h), (255, 0, 0), 2)
cv2.imshow('Video', frame)
if cv2.waitKey(1) & 0xFF == ord('q'):
break
video_capture.release()
cv2.destroyAllWindows()
Classification
Train the classifier to detect specific individuals. Validate and test the classifier to quantify accuracy and evaluate the speed of classifiers with video stream.
Communication
Python sends customized emails with the smtplib package.
List of Students (students.txt)
  First,Email
  Eric,eric@example.com
  Jane,jane@example.com
To send an email, you need an account (user name and password) with an SMTP server address from the email provider. For BYU engineering students it is mail.et.byu.edu with the CAEDM user name and password. You must be on a campus IP address or connected through the VPN to send emails from this STMP server.
import smtplib
from email.mime.text import MIMEText
from getpass import getpass
ask = False
if ask:
From = input("Enter email address of the sender: ")
username = input("Enter email user name: ")
smtp_server = input("Enter SMTP server address: ")
password = getpass("Password for "+username+" at "+smtp_server+": ")
else:
From ='Instructor <instructor@example.com>'
username ='my_username'
smtp_server ='mail.et.byu.edu'
password = '1234' # not good practice to put password in the code
url = 'http://apmonitor.com/pds/uploads/Main/students.txt'
students = pd.read_csv(url)
def sendEmail(Subject, bodyText, To, pw):
msg = MIMEText(bodyText)
msg['Subject'] = Subject
msg['From'] = From
msg['To'] = To
server = smtplib.SMTP(smtp_server)
server.starttls()
server.login(username, password)
server.send_message(msg)
server.quit()
return 'Sent to ' + To
Message = '''We missed you in class today. I hope you are doing well.
Today we worked on the project for facial recognition.
Best regards,
John Hedengren
Brigham Young University'''
for i in range(len(students)):
bdTxt = students.First[i] + ',\n\n' + Message
To = students.Email[i]
print(To)
Subject = "Hi " + students.First[i] + ", we missed you today"
sendEmail(Subject,bdTxt,To,password)
Python speaks customized text with the pyttsx3 package.
name = 'Peter'
engine = pyttsx3.init()
engine.say("Welcome to class, "+name)
engine.runAndWait()
MATLAB Live Script

References
- Behera, G.S., Face Recognition using Siamese Networks, Medium, Published Jan 19, 2021.
- Brownlee, J., How to Perform Face Detection with Deep Learning, Machine Learning Mastery, Published August 24, 2020.
- Brownlee, J., A Gentle Introduction to Deep Learning for Face Recognition, Machine Learning Mastery, Published May 31, 2019.
- Mebsout, I., Object detection & Face recognition algorithms, Towards Data Science, Published Feb 14, 2019.
- Noor, T., Facial Recognition Using Deep Learning, Towards Data Science, Published Mar 22, 2017.
- Wikipedia, Object detection and Face Detection, Retrieved March 20, 2021.