Road Detection

Objective: Use OpenCV Code to explore features that are effective for lane detection such as Binary, Edge, Line, Difference, RGB, and HSV transformations. Add HSV decomposition to the code.
import numpy as np
import cv2 as cv
from PIL import Image, ImageTk
from tkinter import Tk, Frame, Button, BOTH, Label, Scale, Radiobutton # Graphical User Inetrface Stuff
from tkinter import font as tkFont
import tkinter as tk
camera = cv.VideoCapture(0)
width = int(camera.get(cv.CAP_PROP_FRAME_WIDTH))
height = int(camera.get(cv.CAP_PROP_FRAME_HEIGHT))
videoout = cv.VideoWriter('./Video.avi', cv.VideoWriter_fourcc(*'XVID'), 25, (width, height)) # Video format
# Button Definitions
ORIGINAL = 0
BINARY = 1
EDGE = 2
LINE = 3
ABSDIFF = 4
RGB = 5
HSV = 6
def cvMat2tkImg(arr): # Convert OpenCV image Mat to image for display
rgb = cv.cvtColor(arr, cv.COLOR_BGR2RGB)
img = Image.fromarray(rgb)
return ImageTk.PhotoImage(img)
class App(Frame):
def __init__(self, winname='OpenCV'): # GUI Design
self.root = Tk()
self.stopflag = True
self.buffer = np.zeros((height, width, 3), dtype=np.uint8)
global helv18
helv18 = tkFont.Font(family='Helvetica', size=18, weight='bold')
# print("Width",windowWidth,"Height",windowHeight)
self.root.wm_title(winname)
positionRight = int(self.root.winfo_screenwidth() / 2 - width / 2)
positionDown = int(self.root.winfo_screenheight() / 2 - height / 2)
# Positions the window in the center of the page.
self.root.geometry("+{}+{}".format(positionRight, positionDown))
self.root.wm_protocol("WM_DELETE_WINDOW", self.exitApp)
Frame.__init__(self, self.root)
self.pack(fill=BOTH, expand=1)
# capture and display the first frame
ret0, frame = camera.read()
image = cvMat2tkImg(frame)
self.panel = Label(image=image)
self.panel.image = image
self.panel.pack(side="top")
# buttons
global btnStart
btnStart = Button(text="Start", command=self.startstop)
btnStart['font'] = helv18
btnStart.pack(side='right', pady = 2)
# sliders
global Slider1, Slider2
Slider2 = Scale(self.root, from_=0, to=255, length= 255, orient='horizontal')
Slider2.pack(side='right')
Slider2.set(255)
Slider1 = Scale(self.root, from_=0, to=255, length= 255, orient='horizontal')
Slider1.pack(side='right')
Slider1.set(0)
# radio buttons
global mode
mode = tk.IntVar()
mode.set(ORIGINAL)
Radiobutton(self.root, text="Original", variable=mode, value=ORIGINAL).pack(side = 'left', pady = 4)
Radiobutton(self.root, text="Binary", variable=mode, value=BINARY).pack(side = 'left', pady = 4)
Radiobutton(self.root, text="Edge", variable=mode, value=EDGE).pack(side = 'left', pady = 4)
Radiobutton(self.root, text="Line", variable=mode, value=LINE).pack(side='left', pady=4)
Radiobutton(self.root, text="Abs Diff", variable=mode, value=ABSDIFF).pack(side='left', pady=4)
Radiobutton(self.root, text="RGB", variable=mode, value=RGB).pack(side='left', pady=4)
Radiobutton(self.root, text="HSV", variable=mode, value=HSV).pack(side='left', pady=4)
# threading
self.stopevent = threading.Event()
self.thread = threading.Thread(target=self.capture, args=())
self.thread.start()
def capture(self):
while not self.stopevent.is_set():
if not self.stopflag:
ret0, frame = camera.read()
if mode.get() == BINARY:
if Slider1.get() > 0 and Slider1.get() < 255:
frame = cv.inRange(frame, (Slider1.get(), Slider1.get(), Slider1.get()), (Slider2.get(), Slider2.get(), Slider2.get()))
elif mode.get() == EDGE:
frame = cv.Canny(frame, Slider1.get(), Slider2.get())
elif mode.get() == LINE:
gray = cv.Canny(frame, Slider1.get(), Slider2.get())
lines = cv.HoughLinesP(gray, 1, np.pi/180, 100, minLineLength=10, maxLineGap=30)
if lines is None: continue
for line in lines:
x1, y1, x2, y2 = line[0]
cv.line(frame, (x1, y1), (x2, y2), (0, 255, 0), 2)
elif mode.get() == ABSDIFF:
temp = frame
frame = cv.absdiff(frame, self.buffer)
self.buffer = temp
elif mode.get() == RGB:
half = cv.resize(frame, (int(width/2), int(height/2)))
b,g,r = cv.split(half)
top = cv.hconcat([half, cv.merge((r, r, r))])
bottom = cv.hconcat([cv.merge((g, g, g)), cv.merge((b, b, b))])
frame = cv.vconcat([top, bottom])
image = cvMat2tkImg(frame)
self.panel.configure(image=image)
self.panel.image = image
videoout.write(frame)
def startstop(self): #toggle flag to start and stop
if btnStart.config('text')[-1] == 'Start':
btnStart.config(text='Stop')
else:
btnStart.config(text='Start')
self.stopflag = not self.stopflag
def run(self): #run main loop
self.root.mainloop()
def exitApp(self): #exit loop
self.stopevent.set()
self.root.quit()
app = App()
app.run()
#release the camera
camera.release()
cv.destroyAllWindows()
Lane Detection
Alerts from driving assist and self-driving cars must detect the road path. There are many strategies to detect the lane and road path. A preliminary step is to create contrast between lane markings and road surface. This is important to determine the continuity of a lane boundary even when there are dashed lines. The region of interest (ROI) helps to focus on specific parts of the image such as the lower half so that the sky is ignored. The ROI may be predicted using the previous frame if the car is changing incline over a hill. Conditions such as fixed or smoothly varying lane width can also limit the search to parallel lane markings and help to reduce false positives.
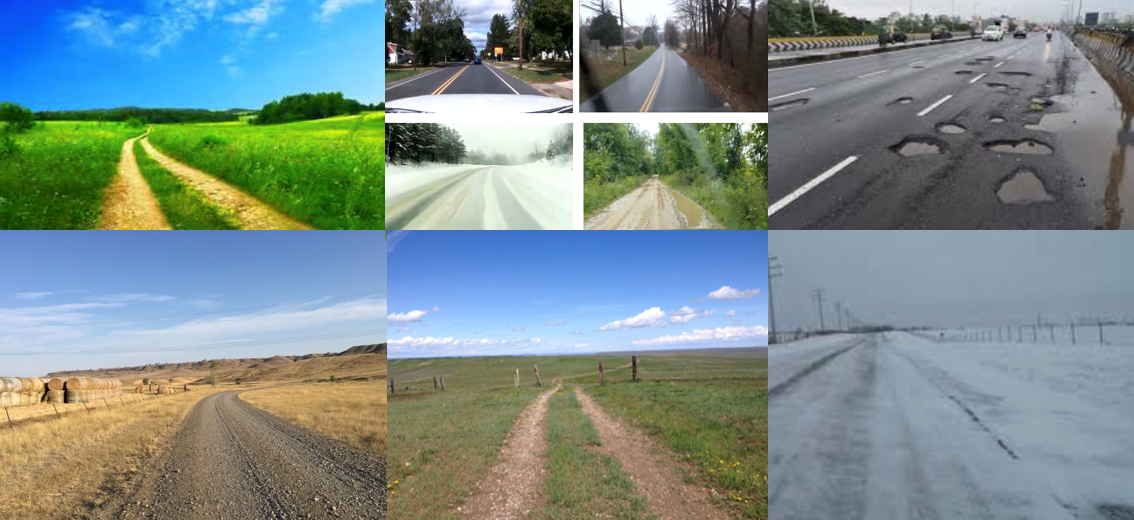
There are also many road geometry assumptions such as straight, curved, parabola, quadratic, and 3D horizontal and vertical curvature models. Multi-cue fusion includes lane markers, road edges, road color, non-road color, road width, and elastic lanes. Prior work includes hypothesis validation, mean shift algorithm, neural network based (e.g. ALVINN), and temporal correction with position and orientation with respect to the center line between two lane markings. Autopilot features have advanced to the point of commercialized self-driving cars with driver assist when needed. Full autonomy may soon be a standard feature.
Exercise
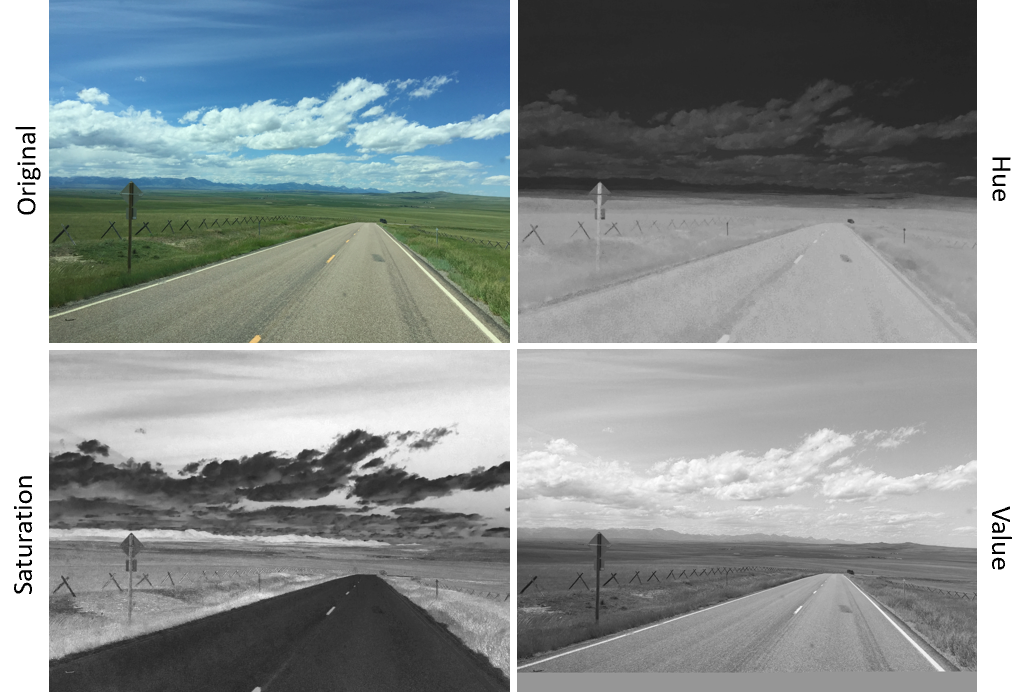
Start with the OpenCV Demo script to explore various methods to increase the contrast for lane detection. Add a quad split similar to the RGB option but that shows Hue, Saturation, and Value (HSV) in this alternate color space. Point the camera at a photo of a road and adjust the lower and upper tolerance to clearly distinguish the road area.

Run the Demo_OpenCV.py script and click Start to begin the image capture. Select the radio buttons to switch between modes.
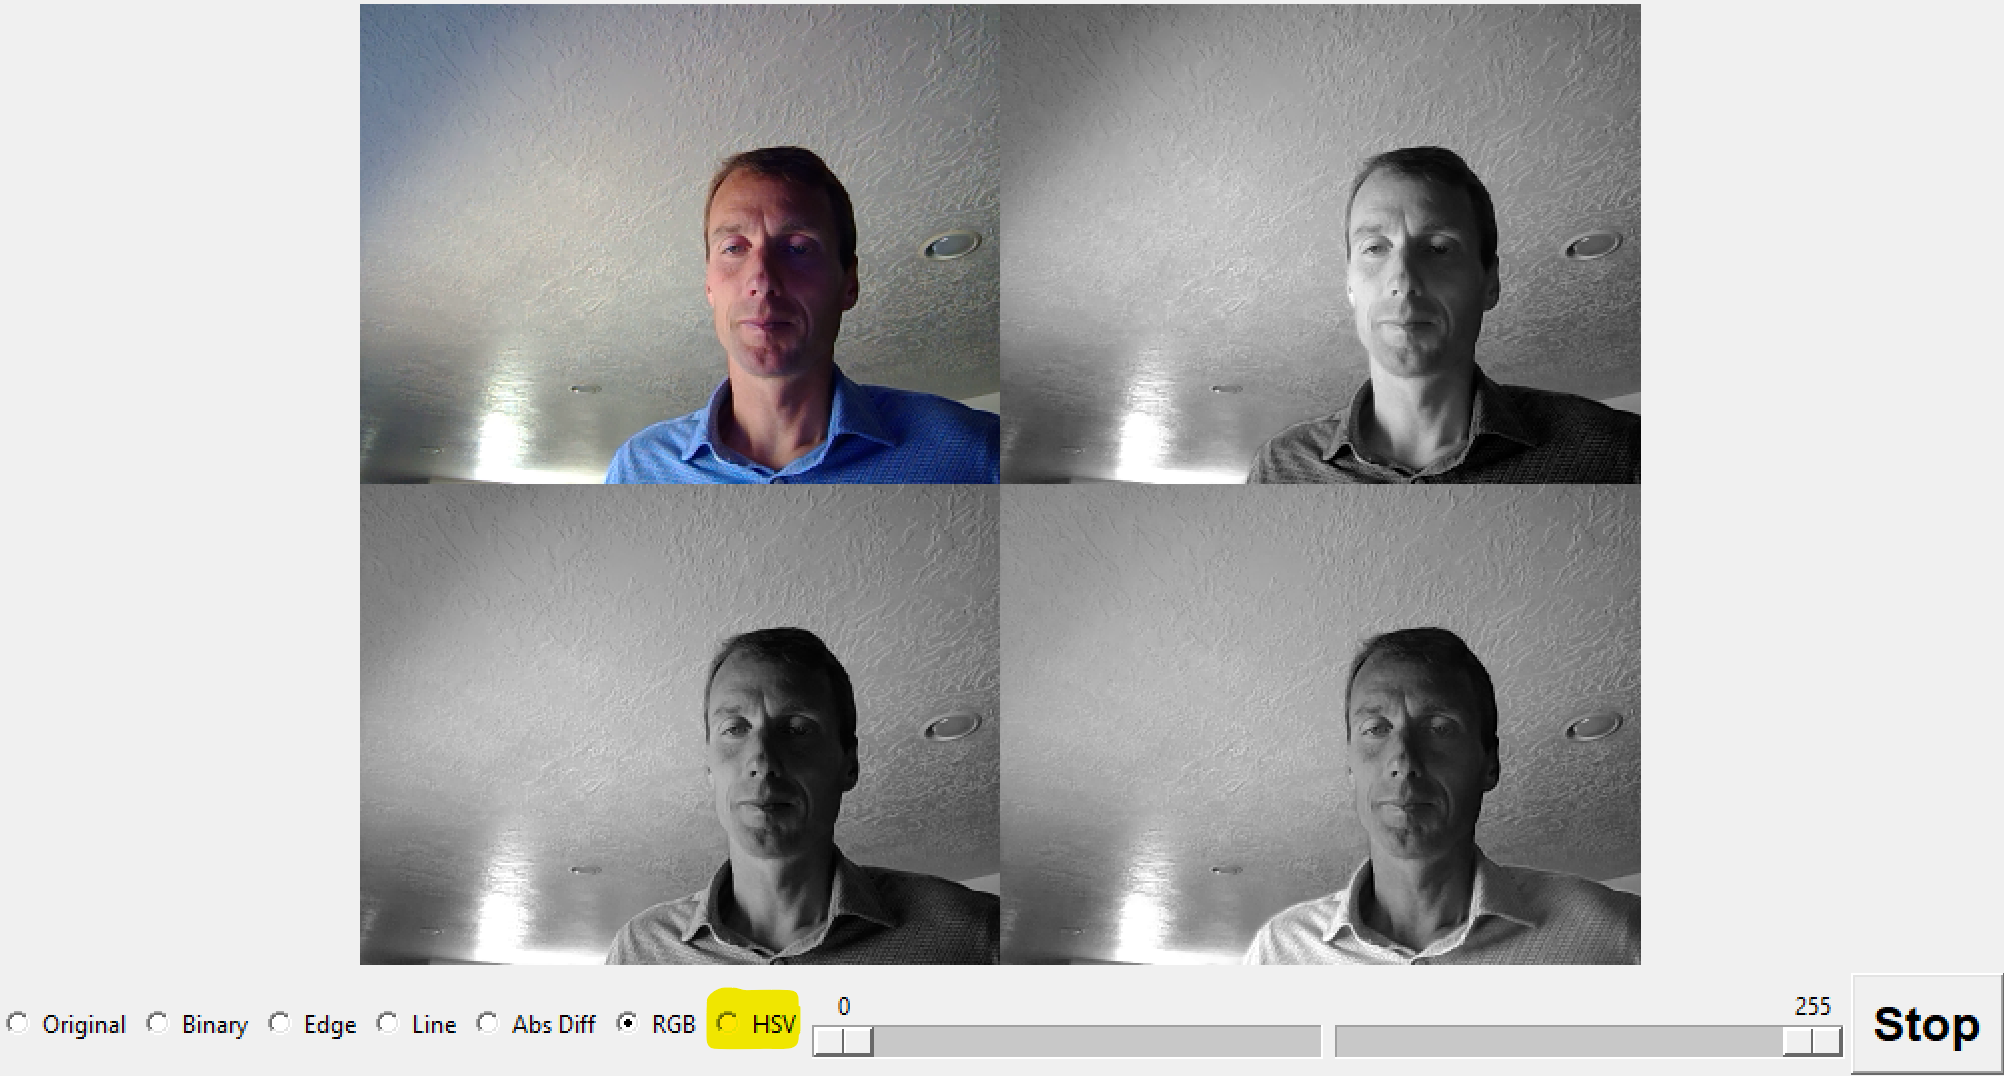
The radio button for HSV is missing the correct code to split and view the image in separate channels. Add the HSV code and display the separate channels. Adjust the tolerance sliders to improve the road and lane detection.
half = cv.resize(frame, (int(width/2), int(height/2)))
hsv = cv.cvtColor(half, cv.COLOR_BGR2HSV)
h,s,v = cv.split(hsv)
if Slider1.get() > 0 and Slider1.get() < 255:
kernel = cv.getStructuringElement(cv.MORPH_RECT, (3, 3))
s = cv.inRange(s, Slider1.get(), Slider2.get())
s = cv.morphologyEx(s, cv.MORPH_OPEN, kernel)
v = cv.inRange(v, Slider1.get(), Slider2.get())
v = cv.morphologyEx(v, cv.MORPH_OPEN, kernel)
top = cv.hconcat([half, cv.merge((h, h, h))])
bottom = cv.hconcat([cv.merge((s, s, s)), cv.merge((v, v, v))])
frame = cv.vconcat([top, bottom])
Thanks to DJ Lee, BYU ECE Professor, for the computer vision material and for sharing research and industrial experience with the class.
Generative AI Learning
Use these prompts to test your understanding after completing the exercise. Direct the AI — you must be able to predict what each transformation does before you run it.
Tip: This exercise is the classical baseline that modern lane detection builds on — production systems now use learned segmentation networks (CNNs and vision transformers), but they are tuned and debugged by engineers who can read exactly these HSV, edge, and line features. See Deep Learning Classification for the learned approach.
What to Turn In
Submit a short report (PDF, 1-2 pages) that curates your results into a demonstration of what you learned. You may use Generative AI to help write the report, but you must supply the correct images, justifications, and settings. Answer these questions:
- Include screenshots of the same road scene under Binary, Edge, Line, and your HSV decomposition, with the tolerance settings used for each.
- Which single feature (or combination) best separated the lane markings from the road surface in your scene, and what lighting or scene change would defeat it?
- From the generate-then-verify prompt: did the H, S, and V images match the AI's prediction? Describe one mismatch and its explanation.
- From the quiz prompt: one question you missed and the corrected answer.